Image Manipulation
Task 6 defined two problems, the second of which required the following two tasks to be accomplished:
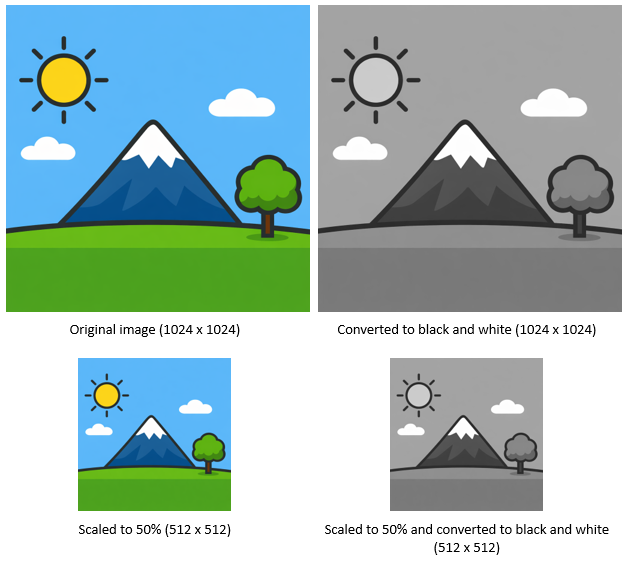
- Scale a given image file to a specified positive value.
- Convert a given image to black and white.
It was suggested to use the Pillow package for image manipulation. Let us do the following:
- Install Pillow package from PyPI.
- Study the documentation to read an image from file, change resolution of an image, convert an image to black and white.
- Try out the commands from Python REPL.
- Develop a function to perform the specified tasks.
- Develop a CLI application to use the function.
Install Pillow
Application Development
Pillow Documentation
Pillow documentation is searcheable and searching for the selected keywords yielded the following results:
- Keyword: scale. Result:
PIL.ImageOps.scale(image: Image, factor: float, resample: int = Resampling.BICUBIC) → Image - Keyword: resize. Result:
Image.resize(size: tuple[int, int] | list[int] | NumpyArray, resample: int | None = None, box: tuple[float, float, float, float] | None = None, reducing_gap: float | None = None) → Image - Keyword: convert. Result:
Image.convert(mode: str | None = None, matrix: tuple[float, ...] | None = None, dither: Dither | None = None, palette: Palette = Palette.WEB, colors: int = 256) → Image
Let us use PIL.ImageOps.scale to scale the image and PIL.Image.convert() to convert the image to grayscale with the
Try Pillow in Python REPL
Open Python REPL or (IPython REPL inside Spyder IDE) and try the following:
>>> from PIL import Image
>>> import PIL.ImageOps as imgops
>>> img_fname = "sample_img01.png"
>>> img = Image.open(img_fname)
>>> img.show()
>>> scale = 0.5
>>> img1 = imgops.scale(img, scale)
>>> img1.show()
>>> img2 = img.convert("L")
>>> img2.show()
>>> img3 = imgops.scale(img, scale).convert("L")
Alert
Pillow is imported as PIL not pillow!
Function and Application
The function will replicate the code tried out in the Python REPL. Its interface is as follows:
Name of function: process_image()
Input parameters:
image: PIL.ImageObject read from file in a format readable by Pillow.scale: float=1Scaling factor assumed as1if not provided.bw: bool=FalseConvert image to grayscale if True.
Output parameter: PIL.Image object subjected to one or both of the operations, namely scaling and conversion to grayscale.
Note
- The function
img_scale_bw(img: Image, *, scale: float=1, bw: bool=False)carries out scaling and conversion to black and/or white depending on the values ofscaleandbwand returns the modified image object. - The function
get_output_fname(fname: str, scale: float, bw: bool) -> strreturns the name of the output file by appending_scaledand/or_bwdepending on the values ofscaleandbw. - The function
main(img_fname: str, scale: float=1, bw: bool=False, save: bool=False)is the main driver function that callsimg_scale_bw()given the name of the input image file, scaling factorscale, whether or not to convert the image to grayscale based on the value ofbwand whether to save the modified image to file based onsaveor display the image on screen. This can be easily converted into a CLI application with the help oftyper. - The
PIL.Image.show()function requires a default image viewer application defined by the operating system.
The code below the if __name__ == "__main__": block tests three conditions:
- Apply a scale factor
0.5and save the image to filesample_image01_scaled.png. - Convert the image to grayscale and display the image on screen.
- Scale the image to
0.5times its original size and convert the image to grayscale and display the image on screen.
CLI Application
To convert this application to a CLI application, delete the three lines below the if __name__ == "__main__": block and replace them with a single line typer.run(main).
| image_app.py | |
|---|---|
Now test to verify that the CLI application displays help with the following command:
This should display the following output:
    Usage: image_app.py [OPTIONS] IMG_FNAME

    ╭─ Arguments ──────────────────────────────────────────────────────────────────╮
    │ *    img_fname      TEXT  [required]                                         │
    ╰──────────────────────────────────────────────────────────────────────────────╯
    ╭─ Options ────────────────────────────────────────────────────────────────────╮
    │ --scale                 FLOAT  [default: 1]                                  │
    │ --bw       --no-bw             [default: no-bw]                              │
    │ --save     --no-save           [default: no-save]                            │
    │ --help                         Show this message and exit.                   │
    ╰──────────────────────────────────────────────────────────────────────────────╯
Try the CLI application with the following commands:
Note
- The first command scales the image to half its original size and saves the modified image to
sample_image01_scaled.png. - The second command converts the image to grayscale and displays the converted image on screen.
- The second command scales the image to half its original size, converts the image to grayscale and displays the converted image on screen.
Lessons to remember
The above code is the outcome of a systematic and step-wise refinement of a series of thoughts:
- Understand what is the expected outcome.
- Identify the package that can accomplish the given task and study its documentation to identify the functions that are required.
- Interactively try out the functions to test your own understanding of the ackage, the selected functions to carry out the task and close the gap in your understanding of the package and its usage.
- Design the application using the appropriate approach, procedural paradigm in this case. Thaus, identify the functions required, their signature - name, input parameters and output parameters. Ensure that each function accomplishes a single well defined task. Any time a function grows too large, it is time to design a function, and replace several lines by a single function call.
- Orchestrate the call to lower level functions to build higher level functions. In this example,
main()callsimg_scale_bw()andimg_scale_bw()depends onget_output_fname()to accomplish the task of generating the name of the output file. This organisation is far simpler compared to writing the whole program without using functions at all. These are the advantages that accrue:- Each function accomplishes a simple well defined task and can be developed and tested independently and once tested, it can be used as a black-box, unless you wish to add more functionality/features.
- Complex tasks can be accomplished by relying on lower level functions to handle the simpler tasks.
- Test the application to ensure that all features are working as expected. In this case:
- Scale the image.
- Convert the image to grayscale.
- Display the modified image on screen.
- Save the modified image to file with an appropriate name.
- Or any combination of the above.
- Convert the application to a CLI application to make it usable from the command line.